|
|
|
|
RETURN to BENTLEY RAILBIKE home page |
|
|
A greaser is a device attached to the railroad track to grease the wheel flanges on sharp curves, preventing wear. They can be difficult to spot if there is lush vegetation growing over the roadbed. The easiest thing to see is oily soil and hoses that pass across the track between the ties from one rail to the other. There is no obstruction on one rail. However, on the other rail you will find a large block of steel, the greaser pump, attached to the outside of the rail even with the top of the rail. A steel pin about one inch in diameter sticks up from the pump above the rail. Passing train wheels depress this pin to force out grease.
|
|
***How much will it COST to build a BENTLEY RAILBIKE? I have been asked this question over and over. That is why I post my PARTS LIST here on the web. Go down the list and make your own cost estimate based on the sources available to you. You should start with your own garage or home shop, followed by a trip to the local hardware store. You may want to get something from a nearby metal or welding shop, junkyard, or garage sale. (You might look for an old skateboard with good wheels!) And don't forget. You need to lay your hands on a few pieces of good hardwood such as hard maple, birch, or beech. My PARTS LIST does not include the bicycle. I recommend a lady's bike with in-hub gearing. When you are riding on top of a rail you are 7 inches higher off the ground. The dropped bar on a lady's bike makes it a lot easier, and safer. You also want an old style 3-speed rather than a bike with a derailleur. The in-hub gearing does not collect grass and weeds like a 5 or 10 speed derailleur, and on most railroad tracks 3 speeds are all you need. You can often find old touring bikes at garage sales for under $30. If you want to go high end, a few mountain bikes also meet my recommendations. |
|
(In the LIST supplied with my plans, drawing sheet number is specified for each part shown below.) KEY: FWG - Front Wheel Guide OTR - Outrigger ROLLERS ----- 2 - 2 inch diameter plastic SKATEBOARD WHEELS [FWG] 2 - 6 inch wheels [OTR] *(see NOTE on OUTRIGGER WHEEL further down the page) If you follow the suggestion in the NOTES you will need the parts listed above. However, if you have difficulty finding 6 inch wheels, you can still assemble your bike using a single 2 inch SKATEBOARD wheel on the outrigger as you see in many of my photos. SPRINGS ----- 2 - Extension SPRINGS [FWG swing arms] 1 - Compression SPRING [FWG lift rod lower end] BOLTS ------- 8 - 10-32 x 5/8 [FWG skid bars, cowcatcher] 2 - 10-32 x 1 [FWG spring anchor, lift rod] 3 - 10-32 x 2 [FWG lift rod to lever, lever] 2 - 1/4 inch x 1 [FWG body-stops for swing arms] 2 - 1/4 inch x 1-1/2 [FWG struts to links] 4 - 1/4 inch x 2 [FWG swing arms, OTR junction] 8 - 1/4 inch x 2-1/2 [ 3 join FWG struts to FWG] [ 1 FWG strut to lift rod link] [ 4 OTR clamp brackets] 1 - 1/4 inch x 3 [FWG lift rod end] 2 - 1/4 inch x 3-1/2 [OTR wheel tube clamp blocks] 3 - 5/16 inch x 2-1/2 [ 2 FWG swing arm rollers] [ 1 OTR wheel] SCREWS ------ 2 - 1-1/4 inch long, DRYWALL SCREWS [FWG] HEXNUTS ----- 8 - 1/4 inch [FWG,OTR] LOCKNUTS ---- 4 - 10-32 [FWG] 3 - 1/4 inch [FWG,OTR] 1 - 5/16 inch [OTR] WINGNUTS ---- 2 - 1/4 inch [OTR] *(see NOTE below) WASHERS ----- 6 - to fit 10-32 [FWG lift rod lever] 20 - to fit 1/4 inch [FWG use as needed, OTR] 6 - to fit 5/16 inch [FWG rollers, OTR wheel] NAILS ------- 2 - #8 galvanized wire [FWG swing arm spring anchors] Iron ROD ---- (1/4 inch diameter round - 11 inches total) [ 4 inches OTR pin (A)] [ 4 inches OTR pin (B)] [ 3 inches OTR pin (C)] (5/8 inch diameter round - 4-1/2 inches total) [ 1 inch FWG lift rod link] [ 1-1/2 inches FWG lift rod end plug] [ 1 inch OTR strut (A) plug] [ 1 inch OTR strut (C) plug] Iron BAR ---- (1/8 inch thick x 3/4 inch wide - 17 inches total) (STRAP IRON) [ 12 inches FWG for 2 swing arm skid bars] [ 5 inches OTR for 2 clamp block straps] (1/8 inch thick x 1 inch wide - 8 inches total) [ 5 inches FWG for 2 strut links] [ 3 inches OTR for (C) bracket] Steel SHEET - (18 gauge x 8 inches x 3 inches - galvanized) [FWG] Steel TUBE -- ( 2 - 10 foot lengths x 1/2 inch nominal diameter) (CONDUIT) [ 38 inches FWG lift rod] [ 60 inches OTR strut (A)] [ 54 inches OTR strut (C)] ( 1 - 10 foot length x 3/4 inch nominal diameter) [ 17 inches OTR wheel tube] [ 63 inches OTR strut (B)] Iron PIPE --- (1/2 inch nominal galvanized iron pipe - 2-1/2 inches) (WATER PIPE) [ 1 inch OTR wheel tube reinforcement] [ 1-1/2 inches OTR strut (B) reinforcement] HARDWOOD ---- 1 piece - 3/4 x 1-1/4 x 3-5/8 [FWG skid block] 1 piece - 3/4 x 3-5/8 x 6 [FWG body] 2 pieces - 3/4 x 3-9/16 x 6 [FWG swing arms] 2 pieces - 3/4 x 1-1/16 x 21-1/2 [FWG struts] 1 piece - 1-5/8 x 2-1/2 x 2-5/8 [FWG angle block] 1 piece - 3/4 x 3/4 x 9-1/2 [FWG lift rod lever] 1 piece - 3/4 x 3/4 x 3 [FWG lift rod lever] 4 pieces - 3/4 x 1-1/16 x 3-1/2 [OTR brackets] 2 pieces - 3/4 x 3 x 3 [OTR clamp blocks] 1 piece - 1 x 3 x 3 [OTR clamp block] . . . . And that's all folks! Aside from the hardware at the top of the list, there really isn't a lot to get, or a lot to work on. |
|
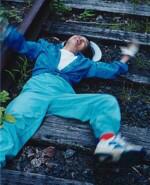
***Does the rear wheel track well without coming off the rail? The Rear wheel tracks VERY well, so long as you follow the directions for adjustment. AND, you can add even more to your security by 'steering' (pulling the front wheel) in the opposite direction to any curves you encounter. This moves the front wheel to the outside of the rail within the limitations of what the front wheel guide allows thereby increasing the safety margin. If you desire extra security, I have designed a simple rear wheel guide that actually 'steers' the rear wheel without moving the rear wheel axle. I have not yet drawn up plans for this device, but it has been in use on my wife's bike since Memorial Day 2000, and the only derailment she has had in all that time occurred recently when she failed to notice a 'greaser' attached to the rail ahead. It knocked her front wheel guide right off the rail. She didn't get hurt, and it did no damage to the bike, but that is why I have placed the big warning at the top of this page. ***Can you lift the whole contraption easily off the track? There is a fallen tree on the line I'm considering using. The BENTLEY Railbike is VERY lightweight. I can move my bikes around obstacles even when loaded up with camping gear, etc. But, if you use that line often, take along a small bow saw and REMOVE that tree - for yourself, and others who use the line! ***Do you have a problem with flat tires? I heard that the man who runs Railbike Tours, Inc. in WA uses flat free tires. Why? Like anything with pneumatic tires, railbikes can get flats. The most common cause is derailment. The wheel drops off the rail with the full weight of the rider. The tube can be punctured when it is pinched between the rim and something hard below. That is why I recommend that the tires be inflated to the highest pressure the tires can withstand. Hard tires also 'track' better, reducing the likelihood of derailment, and making it easier to survive without a flat if you do derail. Vegetation, particularly thorny plants that lay across the rail can also give you flats. This is far more of a problem in the drier, thornier parts of the country than it is here in the east. While on a group trip through the desert in southern California awhile back, several railbiking friends encountered thorns that blew out their tires. My wife and I had better luck! Flat tires have not been a frequent event in my 40 plus years of railbiking. However, a flat on a railbike far from roads and other sources of assistance can be a problem if you are not prepared. I always carry along extra tubes, a patch kit, tire pump, and tools to change tires. I have only had to use them a few times, but was very glad I had them. If flat tires are a concern, you might want to consider using Amerityre FlatFree Tires. ***Do wide tires work better than narrow tires on Railbikes? Wide tires, if they are inflated HARD, may give a slight advantage. However, most of mine are the old narrow touring bike width. I do have one old coaster-brake bike with 'fat' tires and it seems to track rock solid, but that is my only experience. I do not think it makes a great deal of difference. ***Why do you support the Front Wheel Guide with a rod and lever arrangement connected to the handlebars? Wouldn't it be simpler to let the Front Wheel Guide ride along the rail on a little wheel like I've seen in other railbike designs? The most obvious benefit of using the Lift Rod and Lever system is that it makes it very easy to raise the Front Wheel Guide when you wish to ride your bicycle off the railroad. HOWEVER, the most important benefit is NOT obvious. Front Wheel Guides supported on little rollers depend on gravity to hold them down against the rail. If the little support wheel hits a stone, an uneven rail joint, or anything else that might make it bounce, the entire Front Wheel Guide can leave the rail leading to instant derailment. This is only the beginning of your troubles. That same Front Wheel Guide, still under the influence of gravity, but no longer supported by a rail, continues to drop into the roadbed. When it hits the ground below the rails it almost always finds a way to implant itself solidly behind the edge of a tie or other unmovable object. The bicycle, however, and you along with it are still moving at 5 - 25 miles per hour down the track. This is what accounts for those stories of railbikers flying head over tea kettle as their bikes do a somersault through the air. Ouch! (I did not witness it, but just such an accident happened to one unfortunate fellow during a group railbike outing I attended a few years back.) This series of events has never taken place with a Bentley Railbike. Sure, I've had derailments. But, they have always been rather benign affairs. The bike rolls along on the ties in a rather ungainly fashion for a short way giving you a bit of an upset. But, I've never taken a spill as described above. |
|
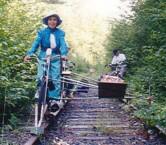
***OUTRIGGER WHEEL The Bentley RAILBIKE pictures shown throughout MOST of this site show a single skateboard wheel riding along the opposite rail. This accounts for the total of 3 wheels called for in the LIST of MATERIALS, the other 2 wheels being used in the FRONT WHEEL GUIDE. However, larger wheels can bridge the gap one sometimes encounters at rail splices. Also, when you are carrying a load lashed down on the OUTRIGGER, and must leave the railroad and travel down some back roadway, the larger wheels work far better. Consequently, I have recently started using larger wheels around 6 inches in diameter. Also, because these larger diameter wheels are generally narrower than my skateboard wheels, I have been using them in the double wheel configuration shown in my PLANS, where I present the alternative of using two skateboard wheels. I end up with a combined width of nearly 4 inches so I do not have to worry as much about rail spread on old track. Larger wheels with hard rubber tires and ball bearings are available in hardware stores. Often they require an axle diameter larger than 5/16. In this case I recommend that you make plastic or metal BUSHINGS with a 5/16 inside diameter and outside diameter to match your wheels rather than using a larger diameter axle bolt which will require you to drill away far too much of the OUTRIGGER TUBE. Keep in mind, the double wheel arrangement requires a slightly longer strut (B), and you should modify the Construction Sequence for drawing SHEET 9 by blocking up the end of STRUT (B) approximately 12 inches off the floor (for 6 inch wheels) rather than the 8 inches specified in the PLANS. This will slightly change the angle between the 2 large holes in the CLAMP BLOCK assembly, as well as the final lengths of both STRUTS (A) and (C). |
|
*** Up among the hardware you will see listed 2 WINGNUTS. These are used on the OUTRIGGER, on the bolts that hold the OUTRIGGER WHEEL tube in place, and must be loosened, then tightened whenever you wish to change the OUTRIGGER WHEEL height - usually on tight curves. WINGNUTS work, and I have used them for years, but they are hard to loosen with your bare hands, and eventually, their short thread length will ruin the threads on the bolts. I am now recommending that you replace these WINGNUTS with T-handle NUTS. You will probably have to make them yourself, but it's worth it. If you have been using WINGNUTS for awhile, and doing much adjustment, you should replace the CLAMP BLOCK bolts at the same time. Construct T-handle NUTS as follows: Use a 1-1/4 inch length of 1/2 inch round steel bar. Drill a 13/64 inch hole through the center, down the entire length. Using a 1/4 - 20 tap, thread the entire length of the hole. Next, drill a 1/4 inch diameter hole crosswise through the 1/2 bar near one end. Center a 3 inch length of 1/4 inch diameter steel rod in this hole, and fix it in place with a 1/4 inch set screw. A faster, and more permanent way to fix the 1/4 inch rod in place is to smack the half inch piece on the side with a hammer. |
|
***HARDWOOD A number of the parts are constructed using HARDWOOD. By HARDWOOD, I mean HARD MAPLE, BIRCH, or BEECH. I do NOT mean oak, hickory, cherry, or any other RELATIVELY hard wood. A few of my early plan sets also suggested the alternative use of HARDWOOD PLYWOOD for several of the parts. Unfortunately, it is difficult to find HARDWOOD PLYWOOD anymore that is actually hardwood all the way through. Now, when you ask for HARDWOOD PLYWOOD, they try to sell you a material with softwood in the center, and a thin veneer of hardwood on each face. So, my plans no longer mention HARDWOOD PLYWOOD. |
|
***GLUE FRONT WHEEL GUIDE I usually glue the FRONT WHEEL GUIDE BODY, SKID BLOCK, and ANGLE BLOCK together into one solid unit using a good 2 part waterproof glue. Even with this precaution, the BODY usually develops cracks inward from the holes on each side where the Guide Roller SWING ARMS attach. But, with the assembly glued together the cracks go no further, and performance of the Railbike is not affected. |
|
***OUTRIGGER ATTACHMENT BRACKETS My PLANS call for hardwood OUTRIGGER ATTACHMENT brackets at 2 points. These brackets work fine as shown. However, a few years back, before I started recommending that the STEEL PIN at the rear axle attachment point be secured with a safety pin (or paper clip, or piece of wire), my dad was riding along carefree as you please, unaware that he had somehow lost that unsecured rear axle PIN. The Bentley RAILBIKE design is good, but not so good that it could go on forever without that rear PIN holding it together. The rear OUTRIGGER strut finally pulled away allowing the OUTRIGGER wheel to ride off the rail, crash down against the ties, and to violently twist the main OUTRIGGER strut pinned to the wood ATTACHMENT BRACKET beneath the bicycle seat. The wooden BRACKET split! Luckly, there was enough bracket left to hold most of it to the bike. I pulled a long bolt out of my spare parts bag, used that in place of the pin beneath the seat because the bolt stuck out farther on each side, then lashed the bolt tightly against the remainder of the wooden ATTACHMENT BRACKET, and rode safely home. In fact, this jury rigged repair felt so solid that I never got around to properly fixing that split BRACKET until the following spring! When I finally did fix the ATTACHMENT BRACKET, I added a short length of 1/8 inch thick, 1 inch wide STRAP IRON to each side of the bracket. Each of these 2 identical pieces of STRAP IRON has 3 holes matching the 2 bolt holes and 1 pin hole in the wood bracket segments making the entire assembly far stronger. You may wish to add this enhancement to your wooden brackets also. |
|
***BOOB PROTECTOR I have to credit my wife Sudjai with this one. In a minor derailment many years back, she bumped herself against the LIFT ROD LEVER. She received a painful bruise that didn't go away for weeks. To prevent further trauma, she padded the handle, and called it her "Boob Protector". We now make these using a 6 inch length of foam plastic. [Stores call them 'Fun Noodles', and children play with them in the water.] I use a piece of 1/2 inch steel conduit, heated for a few moments in a gas flame, to melt a hole up one end about 4 inches deep. This leaves a central core that you must break out. Shove the finished product on over the LEVER handle. A couple of wide rubber bands (as come on fresh BROCCOLI) wrapped around the bottom end will help insure it stays in place. |
|
***LUGGAGE RACK I have tried several different Luggage Racks, including the gigantic one described in 'Railbike Adventure'. My most recent design is easy to make, and easy to attach and detach. I use a single piece of 3/8 inch plywood approximately 16 x 27 inches - you may round the corners, or not, at your pleasure. This sets on the two lower OUTRIGGER STRUTS (A and C) out at the far end, just touching STRUT (B) where it converges from above. I let it project mostly forward, and the upward tilt at the front helps keep luggage in place back against STRUT (B). The plywood platform is held in place using two wood clips along the back edge, underneath, and forward of STRUT (C). These little wood clips are attached with bolts passing up through the clips, and up through holes in the plywood where wingnuts hold them securely. Secure your luggage with bungee cords. |
|
RETURN to TOP RETURN to BENTLEY RAILBIKE home page |
|
RAILBIKERS HAVE ONE TRACK MINDS! |
|
Site Design Copyright©2000 Richard Bentley All rights Reserved. I can build a site for you. Contact me. Other Bentley web sites: mtarab.freeservers.com p2p.htmlplanet.com |